TL;DR: Ice dams form when heat escaping through your roof melts snow, which refreezes at the cold eave and builds a wall of ice. That wall traps meltwater, which backs up under shingles and leaks into your home. At Park City’s elevation, above 6,800 feet in many neighborhoods, heavy snowfall and rapid temperature swings make this one of the most common causes of interior water damage every winter. Safe removal means low-pressure steam or careful hand tools, not chipping or rock salt. If water has already entered the structure, drying must start within 24 to 48 hours to prevent mold.
If you’re watching a brown water stain spread across your ceiling while snow sits three feet deep on your roof, you’re dealing with an active ice dam leak. It’s one of the most frustrating winter problems for Park City homeowners because the damage is happening inside while the cause is outside and frozen solid. The good news: once you understand how ice dams work at altitude, you can remove them safely, stop the leak, and know exactly what your insurance adjuster needs to hear.
Why Do Ice Dams Form on Park City Roofs?
Ice dams form because the upper portion of your roof is warm enough to melt snow, but the eave overhang stays below freezing. Heat from your living space escapes through the attic and warms the roof deck above it. Snow melts, water runs down toward the eave, hits the frozen overhang, and refreezes into a ridge of ice. As that ridge grows, it creates a dam that holds pooling water against your shingles, and shingles are not designed to hold standing water.
Park City’s conditions accelerate this cycle. The base elevation sits around 6,800 feet, with neighborhoods like Deer Valley and Old Town climbing higher. At that altitude, daytime highs can swing 30 degrees in a single day during late winter. A sunny afternoon melts the snowpack; overnight temperatures drop back into the teens. That freeze-thaw cycle repeats daily for weeks. Combine that with the heavy snowfall totals the Wasatch Range delivers, Park City averages over 300 inches of snow per season at the resort, with valley floors receiving far less but still substantial accumulation, and you have near-ideal conditions for ice dam formation on any roof with less than perfect insulation and air sealing.
Older homes near the Historic Main Street corridor and newer construction in Promontory or Canyons Village are both vulnerable, though for different reasons. Older homes often have inadequate attic insulation. Newer homes sometimes have complex rooflines with multiple valleys and low-slope sections where water pools easily.
How Do You Remove an Ice Dam Without Damaging Your Roof?
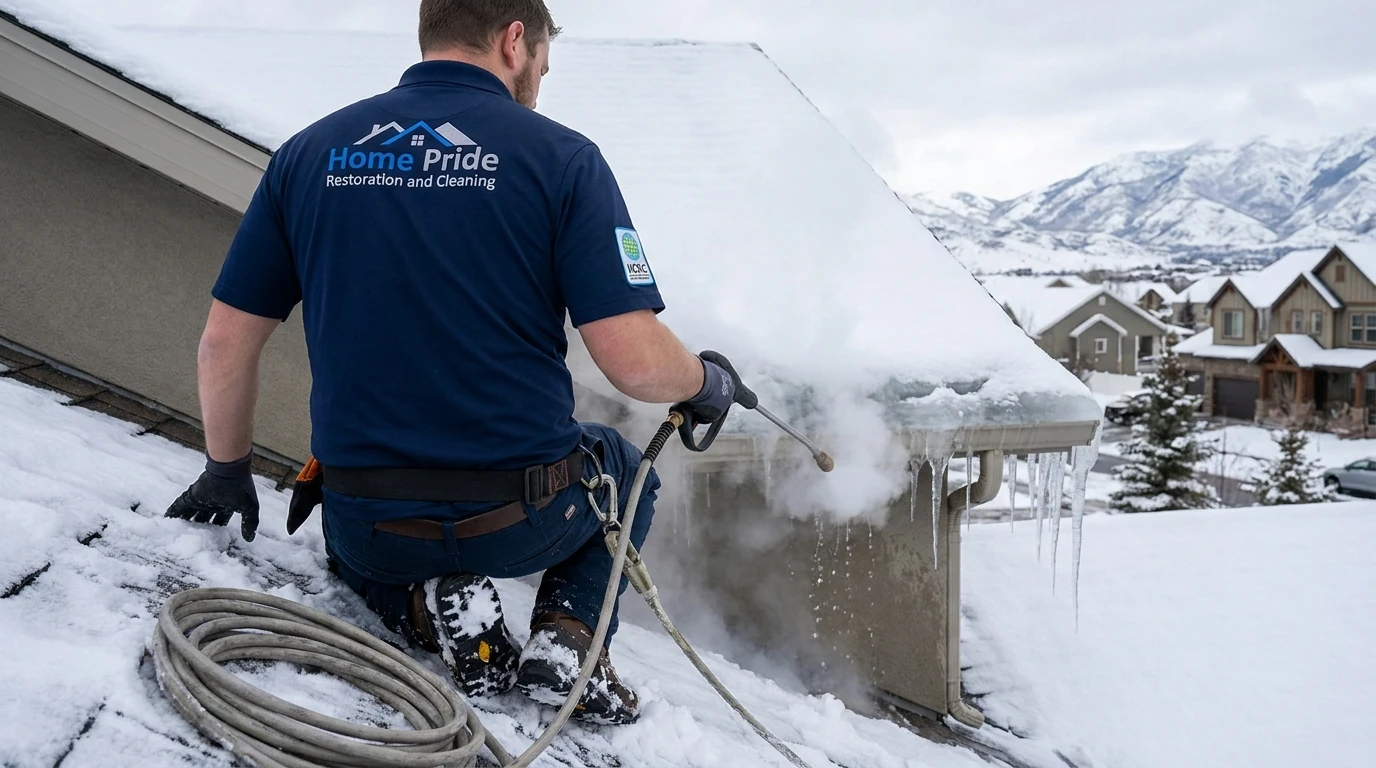
Steam removal is the safest and most effective method for removing ice dams from a Park City roof. A low-pressure steam unit (operating around 15 to 25 PSI, 212°F steam) melts through the ice without the impact force that chips or cracks shingles. A trained technician works from the eave upward, cutting channels through the dam to let trapped water drain before removing the rest of the ice mass.
Here’s what works and what doesn’t:
Steam removal (recommended): Low-pressure steam melts ice cleanly without mechanical force. It’s the IICRC-aligned best practice and what professional restoration crews use. Expect a typical Park City roof to take 2 to 4 hours depending on dam size and roof complexity.
Roof rakes (DIY, limited use): A long-handled roof rake can pull snow back from the eave before it melts and refreezes. This is a prevention tool, not a removal tool. It works best on simple gable roofs with easy ground access. Steep Wasatch-style roofs with heavy snow loads are not safe to rake from the ground.
Calcium chloride (temporary): Filling a nylon stocking with calcium chloride and laying it perpendicular across the ice dam creates a melt channel. It buys time but does not remove the dam. It also leaves residue on roofing materials and landscaping below.
Chipping and hacking (do not do this): Striking ice with an axe, ice pick, or flat bar cracks asphalt shingles, splits wood shingles, and gouges metal roofing. The damage from improper removal often costs more to repair than the water damage itself.
Rock salt (do not use): Salt accelerates corrosion on metal flashing, gutters, and fasteners. It kills vegetation below the drip line. It does not work fast enough to matter in an active leak situation.
If you’re on a two-story or steeply pitched roof, common in Park City’s mountain-contemporary architecture, this is not a DIY job. Ice-covered roofs at elevation are genuinely dangerous. A professional crew has the harness systems, the steam equipment, and the experience to work safely.
What Does Ice Dam Removal Cost?
Professional ice dam removal in the Park City area typically runs $400 to $1,500 for a standard residential roof, depending on dam size, roof pitch, accessibility, and how many linear feet of eave are affected. Complex rooflines with multiple valleys, dormers, or steep pitches push costs toward the higher end. Emergency same-day service during a heavy snow event adds a premium.
Breaking that down:
- Steam removal labor: $200 to $600 for the first two hours; $75 to $150 per additional hour
- Roof complexity surcharge: 20 to 40 percent on steep or multi-valley roofs
- Emergency/after-hours: Add $150 to $300 for same-day or weekend response
- Interior water damage mitigation: Separate cost if water has already entered, see below
The removal cost is often the smaller number. If water has been sitting behind the dam for days, the interior drying and repair work, wet insulation, damaged drywall, stained ceilings, potential mold, can run $2,000 to $8,000 or more depending on how far the water traveled.
Does Homeowners Insurance Cover Ice Dam Damage?
Most standard homeowners insurance policies cover the interior water damage caused by an ice dam, but they typically do not cover the cost of removing the ice dam itself. The distinction matters when you’re filing a claim.
Here’s how it generally breaks down under a standard HO-3 policy:
Usually covered: Water damage to ceilings, walls, insulation, flooring, and personal property caused by water backing up under shingles due to an ice dam. This falls under the “sudden and accidental” damage provision.
Usually not covered: The cost of ice dam removal, roof repair caused by the ice itself, or damage attributed to lack of maintenance (for example, gutters that were already failing before the storm).
Flood insurance (separate policy): Ice dam leaks are not flood damage. They’re handled under your homeowners policy, not a separate flood policy.
What your adjuster will ask for: Date of loss, photos of the ice dam on the roof, photos of the interior damage, a moisture assessment or drying log from a certified restoration company, and documentation that the damage was sudden rather than a slow ongoing leak.
One practical note: if you call a restoration company before calling your insurer, make sure they document everything before any drying equipment is moved. The drying log, moisture readings, and scope of work become your claim documentation. A company that skips written documentation creates problems for your claim later.
What Should You Do Right Now If Water Is Coming In?
If water is actively entering your home through the ceiling or walls, take these steps in order:
- Move valuables and furniture away from the wet area. Water migrates horizontally through insulation before it shows on a ceiling. The stain you see is rarely the full extent of the wet zone.
- Place buckets and lay down towels, but understand this is buying time, not solving the problem.
- Do not turn up the heat to try to melt the dam faster. More heat through the roof deck accelerates the melt-refreeze cycle.
- Call for ice dam removal while the storm is still active if possible. Waiting until the snow melts on its own means days of water infiltration.
- Document everything with photos and video before any cleanup. Timestamp the files.
- Start the drying process within 24 to 48 hours of water entry. Wet insulation and drywall that stay wet past 48 hours enter the mold-risk window. IICRC S500 standards define this as the threshold for Category 1 water damage escalating to a secondary damage situation.
If the ceiling is bulging or sagging with trapped water, carefully puncture it at the lowest point with a screwdriver to let the water drain in a controlled stream rather than a sudden collapse. This is counterintuitive but prevents a ceiling section from failing all at once.
For roof leak repair and interior water damage drying in the Park City area, Home Pride Restoration and Cleaning responds 24/7. Their IICRC-certified crews carry moisture meters, thermal imaging cameras, and commercial drying equipment to assess the full extent of water infiltration, not just what’s visible at the ceiling surface.
About Home Pride Restoration and Cleaning
Home Pride Restoration and Cleaning is an IICRC-certified restoration company serving Park City, Saratoga Springs, and the broader Wasatch Front since 1997 (license RC-25-0737). Their crews handle water damage, roof leak response, storm damage, and mold remediation across Utah County and Summit County. Available 24/7 at (801) 995-2437.